Lighthouse Painting in Watercolor
This week in watercolor class, we explored Light Washes, a playful reference to lighthouses and the beautiful skies surrounding them.
Our focus was learning how to control water, pigment, and brushwork to create soft transitions, atmospheric clouds, and layers of color.
We practiced three essential watercolor washes and explored techniques for creating interesting cloud formations.
Three Watercolor Washes
You Tube Cloud Tutorials: Click Here YouTube Tutorial : Click Here
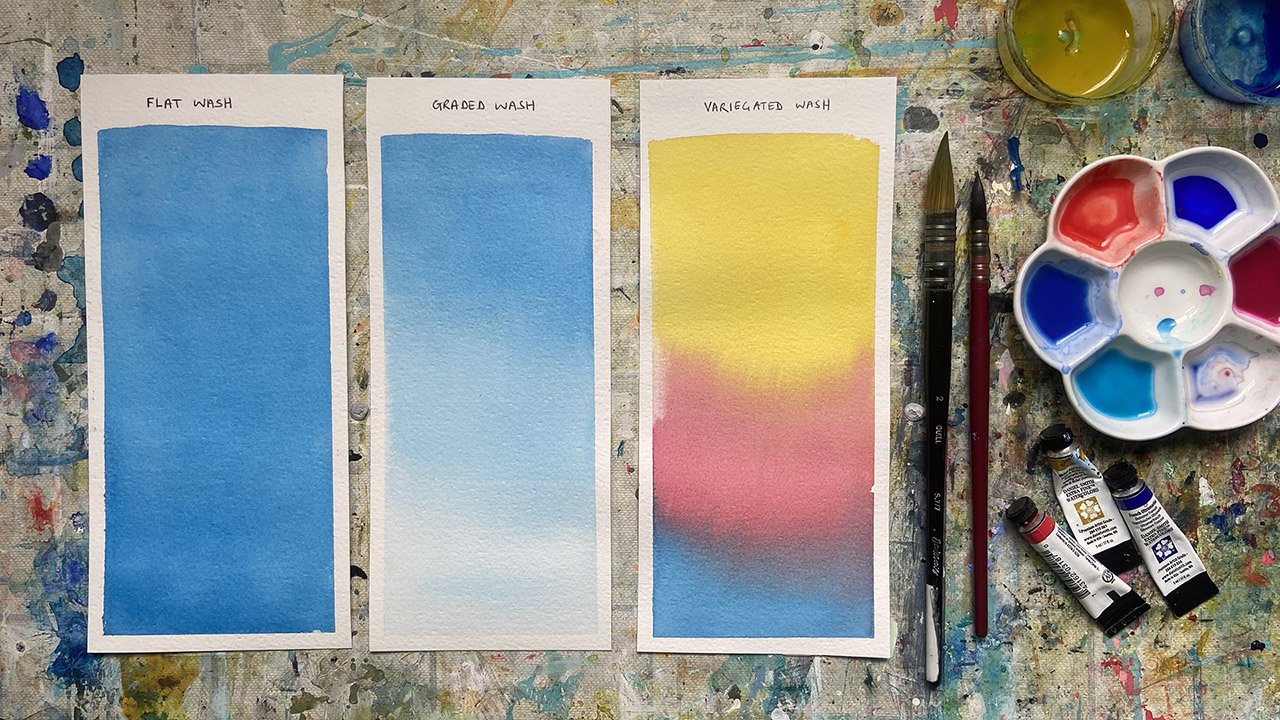
1. Flat Wash
A flat wash creates an even layer of color across the paper.
- Use a consistent amount of pigment and water.
- Work steadily across the paper while maintaining a wet edge.
- Practice creating a smooth, uniform sky.
2. Graded or Graduated Wash
A graded wash transitions smoothly from dark to light or from a stronger concentration of pigment to a lighter one.
Begin with a saturated color.
- Gradually introduce more water as you move down the paper.
- Allow the color to become lighter without creating harsh lines.
3. Variegated Wash
A variegated wash combines two or more colors, allowing them to blend naturally.
- Begin with one color.
- Introduce a second color while the paper is still wet.
- Allow the pigments to mingle without overworking them.
Try blending blue, violet, pink, and yellow to create a colorful sunrise or sunset.
Creating Clouds with Watercolor
After practicing our washes, we explored several techniques for creating clouds and atmospheric effects.
1. Paper Towel Lifting
While the wash is still damp, gently press a folded paper towel against the surface to remove pigment.
This creates soft, light cloud shapes.
Tip: Avoid rubbing the paper. Press and lift to preserve the watercolor surface.
2. Brush Lifting
Use a clean, slightly damp brush to remove pigment from the painted surface.
- Rinse your brush and remove excess water.
- Gently move the brush across the area you want to lighten.
- Blot the lifted pigment with a clean towel.
This technique is useful for shaping clouds, softening edges, and introducing highlights.
3. Water Drop-Ins and Blooms
Drop clean water into a damp watercolor wash to create beautiful blooms.
As the water pushes the pigment outward, it creates irregular shapes and interesting textures.
Experiment: Try adding water at different stages of drying. The results will change depending on how wet the paper is.
Blooms can suggest soft clouds, atmospheric movement, and unexpected patterns in the sky.
4. Layering Washes to Create Clouds
Watercolor skies become more interesting when we build transparent layers.
Allow your first wash to dry completely before adding another layer of color.
Use additional washes to:
- Create darker cloud formations.
- Add depth and dimension.
- Introduce warm and cool shadows.
- Establish contrast between light and dark areas.
Remember, preserving the light areas is just as important as adding darker colors.
Watercolor Vocabulary
Wash: A thin application of diluted watercolor pigment across a surface.
Flat Wash: An even application of color with consistent value.
Graded Wash: A wash that gradually transitions from dark to light.
Variegated Wash: A wash that blends two or more colors.
Lifting: Removing pigment from the paper using a brush, towel, or other absorbent material.
Bloom: A textured effect created when additional water pushes pigment outward in a damp wash.
Glazing: Applying a transparent layer of watercolor over a completely dry layer.
Wet-on-Wet: Applying watercolor or water to an already wet surface.
Value: The relative lightness or darkness of a color.
Your Creative Challenge: Paint a Lighthouse!
Light House images : Click Here
Leave a Reply